The Ultimate Guide to Endmills for CNC Machining: Types, Chip Load, and Tips for Success!
- CNC3D

- Mar 28, 2023
- 3 min read
Updated: Apr 5, 2023
CNC machining has revolutionised the manufacturing industry by offering precise and efficient cutting operations. One essential component of this process is the endmill, a versatile cutting tool used in various applications. This blog post will delve into the different types of endmills, their suitability for specific materials, and how to optimise their performance by understanding chip load and other factors. Plus, we'll share some valuable tips and tricks to ensure the best results for your CNC projects.
Section 1: Understanding the Different Types of Endmills
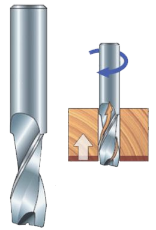
Up-Cut Endmills

These endmills are designed with a clockwise spiral, which lifts the swarf (chips) up and away from the cutting area. They are ideal for cutting slots, pockets, and contours in materials like wood, plastics, and aluminium. However, they might cause surface tear-out in layered materials like plywood and laminates as they force the swarf upwards that can splinter the top edge.
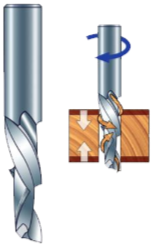
Down-Cut Endmills

Featuring a counter-clockwise spiral, down-cut endmills push the swarf down into the workpiece. This results in cleaner top surfaces, making them perfect for layered materials and applications where edge finish is critical. However, they are not recommended for deep pocketing, as chip evacuation can be problematic.
Straight-Cut Endmills

These endmills have straight flutes and do not produce an upward or downward force. They provide a balanced cut, making them suitable for materials such as plastics, acrylics, and non-ferrous metals. However, proper chip evacuation is necessary to prevent re-cutting and excessive heat build-up.
Compression Endmills

Combining the properties of both up-cut and down-cut endmills, compression endmills have an up-cut spiral at the tip and a down-cut spiral towards the shank. They are ideal for cutting double-sided laminates and veneered materials, providing clean cuts on both top and bottom surfaces.
Ball Nose Endmills

These endmills have a hemispherical tip and are used for 3D contouring, profiling, and finishing operations. They are suitable for materials like plastics, woods, and metals, but require slower feed rates due to their reduced cutting edge engagement.
Section 2: Chip Load and How to Calculate It
Chip load refers to the amount of material removed by each cutting edge per revolution. It is a critical parameter that influences tool life, surface finish, and cutting efficiency. To calculate the chip load, you need to consider the spindle speed (RPM), number of flutes, and feed rate (mm/m).

Here is a handy and simple equation for calculating chip load:
Chip Load = Feed Rate / (RPM x No. of Flutes)
Section 3: Tips and Tricks for Best Results with your endmills
Select the right endmill for your material and application, considering factors like flute geometry, cutting edge length, and coating
Use quality tool holding devices like collets or hydraulic chucks to ensure minimal runout and better tool life. Run out for an endmill means the tool doesn't spin perfectly centred and is a measurement of deviation from the centreline of the cutting tool. This can cause less accurate cuts, faster wear, and rough surfaces.
Use coolant or compressed air to facilitate chip evacuation, reduce heat build-up, and extend tool life. It is a good idea to check with your material supplier for their recommendations on coolant usage.
Always start with conservative feed rates and gradually increase them based on the performance and desired surface finish. This way you can optimise your cuts for a good balance between cut finish and time efficiency.
Regularly inspect and maintain your CNC machine to ensure accuracy, repeatability, and overall performance. If you have a CNC3D machine, there is a user guide for your machine in the "Help" section of CNC3D Commander under "User guides".
Use climb milling (cutting in the same direction as the workpiece is fed) whenever possible to reduce cutting forces, improve surface finish, and extend tool life. This is a great general rule but may not apply to all materials. Sometimes conventional cutting is best. Check your material supplier for any tips and tricks.
Consider using high-speed machining strategies, like adaptive clearing, to optimise toolpath efficiency and minimise cutting forces.
Perform a test cut or simulation before running your program to identify any potential issues and make necessary adjustments. Doing this will mean you can pick up on any issues before you commit to cutting into your material.
Final thoughts and foot notes
Understanding the various types of endmills, their appropriate applications, and how to optimise their performance is critical for successful CNC machining projects.
By carefully selecting the right endmill for your material and application, calculating the optimal chip load, and following the tips and tricks shared in this article, you can significantly improve your machining results, extend tool life, and boost overall productivity.
Remember, the key to successful CNC machining lies in a combination of careful planning, attention to detail, and constant learning.
We hope this has been an informative article for all of you who have been confused with endmills, their intended use and how to use them correctly. :)


Comments