This is the most common problem we see with firmware updates and occurs if the wrong firmware was installed during the update process.
Over time you will need to update the firmware on your CNC controller as technology improves and new features become available. When there is a firmware update available, you will be notified in our Commander software and will be guided through the process of updating.
The firmware required for your controller will depend on several factors, and Commander should be able to determine which version to install automatically.
If you are updating from the original firmware (Version 2.1) or Commander is unable to determine your current version you will be asked a few questions before the software can determine which firmware to install. Please be sure to read the popup boxes carefully and answer the questions accurately.
If your controller was manufactured after March 2022, or is set up for Dual-Axis homing and the wrong firmware is installed, one side (usually Y2) will no longer respond to Y commands including jogging and homing cycles.
If your controller was manufactured before March 2022, or you have a 4th axis and the wrong firmware is installed, you will likely notice homing issues, or your A-axis may not respond to commands.
To fix this, you will need to manually install the correct firmware.
First, follow the steps below to determine the correct firmware for your controller.
To determine which firmware to install you will need to know:
1: What controller you have.
The type of controller will be the first step in determining the correct firmware. You will need to know if you have a Nighthawk, Nighthawk Scribe*, or Nighthawk Pro* controller.
*Nighthawk Scribe and Nighthawk Pro controllers are not yet released, you will have a Nighthawk controller.
2: When your controller was originally built.
Controllers built before March 2022 were tailored to the machine they were built for. These controllers will most often need the 4-Axis firmware even if you do not have a 4th axis, unless your controller has been modified for dual-axis control.
If your controller has been modified for dual axis control you will need the Dual-Axis firmware. If you are unsure, check below for how to identify a dual-axis controller, or select the 4-axis firmware.
3: Whether your controller was built for a 4-axis (Rotary chuck) machine.
If your controller was built for a 4-axis machine you will need a different version of the firmware. These controllers will need the 4-Axis firmware.
4: Whether your controller is capable of “Dual-axis homing” with independent control of the Y2 motor.
If your controller was built to take advantage of “Dual-Axis Homing” you will need a different version of the firmware.
You can tell if your controller was built this way if your machine can dual-axis home (auto-square) by touching both sides of the front of the machine independently.
You will have a limit switch on both the left and right side of the machine on the Y axis. These controllers will need the Dual-Axis firmware.
If your machine does not have 2 limit switches at the front, have a look at the front of your controller. If you have a wire across the green connector in the A-Limit position you will need the Dual-Axis firmware even if your machine isn’t set up for it.

When you have decided on the correct firmware version for your controller, you will need to send it to your controller. Please follow the steps below.
Manual firmware updates can only be done through Commander, via USB.
If you are unable to use a USB connection you will need to contact CNC3D for advice.
1. To get started with this process you will need to have a Windows PC located near the machine so you can connect to it with a USB cable.
Plug in your USB cable, turn on your PC, turn on the Nighthawk and open CNC3D Commander.
Note: If your controller is not installed automatically or detected by your PC, refer to the USB setup section of your user manual.
Select COM in the first drop-down menu. In the second drop-down menu select the correct COM port, it should be the one that has CH340 or CP210x in the description.


2. Click “Connect”. If your connection was successful, take note of the COM number displayed in the second drop-down box. You will need this number in a minute.
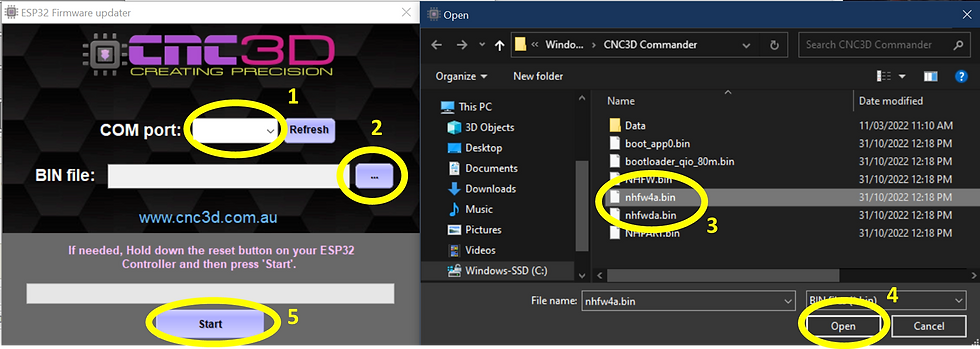
3. Click “Disconnect”, then open the “Help” box on the far-right side, then click on the “CNC3D ESP32 FW Tool” to open the Firmware Update Tool.
4. In the Firmware updater tool which opens, make sure you have the correct COM port selected for your controller then click on the “…” button and select the correct firmware file, then click “open” If you need the 4-Axis firmware, select nhfw4a.bin If you need the dual-axis firmware, select nhfwda.bin

5. You will see the file show up in the BIN file dialogue box, then click “Start”. You will see the green bar slowly fill.
Do not unplug or power off your controller during this process.
6. When the update has completed you will see a message informing you the update was successful. Turn off your controller for 10 seconds, then power it back up.
This should have correctly flashed your firmware.
If the update is not successful the following things may be stopping it:
- Another program is already using that COM port. Please close any other GCODE senders or control programs like Cura, LaserGRBL, Lightburn etc. or click Disconnect in Commander if you are still connected.
- You may have the wrong COM port selected. Try another port.
- Check for antivirus or firewall conflicts and turn them off if possible. McAfee and Norton antivirus programs for example can block connections to external devices if they're not recognised by their programming and cause firmware updates to fail.


